Tech Support: Download Owners Manuals | Email Us | (541) 610-0401

Tech Support
Live Tech-Support | Email Us | Download Specific Product Installation Guides/Owners Manuals & Watch Installation Videos
Live Tech-Support

If you'd like to contact us directly, you can call our main office and speak directly with a Technician. Information can also be faxed to the number below. Make sure to include your name and contact information on anything faxed over to us. Our Tech-Support Hours are 9:00 am to 3:00 pm Pacific Time. Please also check your products Owner's Manuel to see if your question could be answered there.
Tech-Support: (541) 610-0401 | Fax: (541) 325-7449
Email Us

This is the slowest method of resolving your issues. We do have email tech support available but it is very hard to diagnose and discuss problems using this method. If you absolutely cannot call us or need to send us pictures of your monitoring unit or sensors, you can send an email to TechSupport@tech-edge.com. You are also welcome to send us a picture using this email and then call in so we can discuss it. Priority is given to those who phone in using the above number.
If you would like to make a tech support appointment when you will be at your vehicle, you can send a request with your phone number and requested time to call back. We will respond to your email and try our best to reach you during that time. Thank you.
Download Support Documents & Watch Installation Videos

![]() Adobe Acrobat Reader is required to view these files. Click the Adobe "Get Acrobat" link above to download the Acrobat reader free of charge. Follow the instructions on that page for installation and configuration of the Acrobat Reader. For best results, the Acrobat Reader should be configured as a plug-in for you browser. Note: not all of our literature is currently published as PDF files. As we publish our documentation in PDF format it will be listed below. If you need something not listed below contact Tech-Support to request the material by fax.
Adobe Acrobat Reader is required to view these files. Click the Adobe "Get Acrobat" link above to download the Acrobat reader free of charge. Follow the instructions on that page for installation and configuration of the Acrobat Reader. For best results, the Acrobat Reader should be configured as a plug-in for you browser. Note: not all of our literature is currently published as PDF files. As we publish our documentation in PDF format it will be listed below. If you need something not listed below contact Tech-Support to request the material by fax.
Sending your system in for testing and/or repair:

After you have talked with a technician, if you need to send you panel and/or sensors in to be tested or repaired, please send them to the below address:
Tech-Edge Manufacturing
Attn: Repairs
4296 Osage St.
Sweet Home, OR 97386
Please include a note with all your contact information as well as a description of the problem symptoms you are having. There is no charge for testing and diagnosing the problem. Any warranty covered repairs will be determined upon arrival. You will be notified of any repair charges prior to repairs being performed. If you did not purchase directly from us and do not send your purchase receipt with the unit, the warranty coverage will be based on the manufacture date. You will be required to pay for return shipping unless this is a warranty repair. Standard return shipping charges will be covered with warranty work. You can upgrade to rush return shipping by paying the difference.
Please click here for warranty coverage information.
 |
|
|
iSeries Wiring Harness with Diode Modification: This modified harness is used if you have multiple panels going to the same sensors. iSeries Wiring Harness with Diode Modification: Pricing is $25 per wiring harness to modify them on an existing order, or $35 if you are ordering it by itself. |
|
703 – Smart 3 Tank Monitor
|
|
Smart Mini
|
|
Ultra 8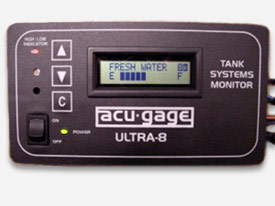
|
The Ultra 8 has been phased out. We are still supporting it with repairs and reprogramming but suggest that if you need a replacement panel, to upgrade to the iSeries system. It is the same size as the Ultra 8 and can even use the same wiring harness if you don’t want to swap out the wires. The wire colors are different but the layout is the same. If you want to upgrade to the iSeries but want to keep your same wiring harness, please select the iSeries panel - Ultra 8 upgrade option. This will come with a small modification to the power switch so you don't have to change out your wiring harness. It will not come with a new wiring harness. You will need to program the iSeries in the same tank layout as the Ultra 8 so the wires will be going to the correct tanks. If you do not know what your current Ultra 8 tank layout is, and it was an original OEM install, we may be able to find that information for you if you give us a call at (541) 610-0401. Sometimes the LCD display will go out on the older Ultra 8 systems. If the system seems to function properly you are just getting odd characters on the display, you can send your panel in to have the LCD replaced for $40. We will do a full testing for no extra charge to make sure there are no other issues. HUNTER ordered Ultra 8 systems with their own custom wiring colors. If you have a Hunter Ultra 8 system, click on the link below to see how those colors correspond with our Ultra 8 system as well as our upgraded iSeries panel. |
Tanks with "Step Out" or
|
If you have a tank with a "step-out" or "ledge" like the one pictured, and the ledge is on the side that you want to install the external MODA sensor, then you will need to have a Copper Wire Jumper Kit sent to you. These are $10 per tank and you will need to specify how long the wires need to be for this kit. It is better to be just a bit long, then a bit short. Click here for the data sheet on how this Jumper Kit needs to be installed. |
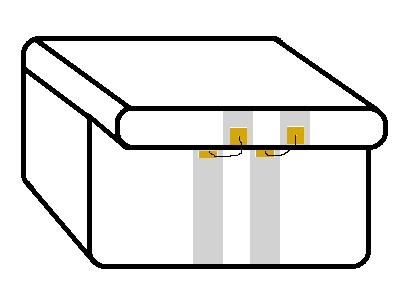
Exterior MODA Sensor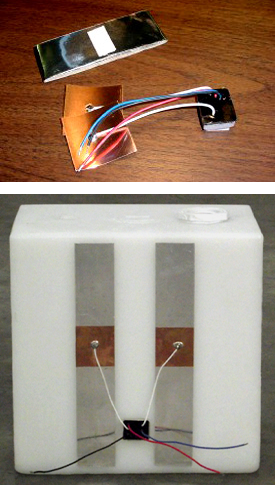
|
Due to its non-invasive nature, the MODA sensor module is simple to install. It is installed by applying 2 vertical strips of aluminum tape to the side of the tank, then sticking the MODA copper patches over them. Installation is completed by sticking the module itself to the tank then extending its wires to the display. Click here to find out how our sensors work. |
Custom Made Interior PVC
|
|
Custom Made Aluminum Diesel
|
|
Resistive Sensors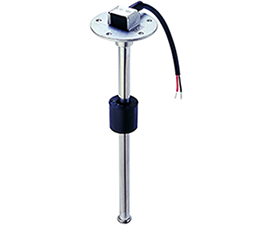 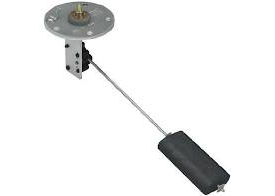
|
|
Troubleshooting
|
|
Older 102 - 3 and 4 Tank Monitors
|
These panels could have the names 102 by Snake River, Geckotec or possibly Larson Electronics.
We do have replacement circuit boards for these panels. They are $75 each. They have the upgraded calibration like the below circuit boards but fit behind the same faceplate. You can order them on the order page under "Accessories and Repair Parts" at the bottom. Please specify in the comments box if you need a wire that runs to the LED's for the switches pre- soldered into the board. 3 Tank with or w/o LPG = Smart3TLP-PCB — This circuit board will only have 9 silver finger connections on the circuit board for the wiring harness connector. 4 Tank without LP only = Smart4T-PCB — This circuit board will have 12 silver finger connections on the circuit board for the wiring harness connector. |
Smart 102 - 3 and 4 Tank with Push Button Calibration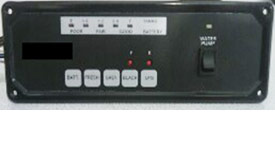 |
These panels could have the names 102 by Snake River, Geckotec, Diamond or Tech-Edge.
3 Tank with or w/o LPG = Smart3TLP-PCB — This circuit board will only have 9 silver finger connections on the circuit board for the wiring harness connector. 4 Tank without LP only = Smart4T-PCB — This circuit board will have 12 silver finger connections on the circuit board for the wiring harness connector. |
Nautical 21No longer available
 |
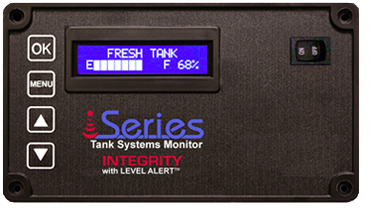
The Nautical 21 was discontinued several years ago. We did not get any information other than the below manual on how to fix this board. The Ultra 8 was an upgrade to this panel and the iSeries is an upgrade to the Ultra 8. If you have this panel, you can swap it out for the iSeries and still use the sensors on your tanks as long as they are still good. If you do not know if you sensors are good, please see the Exterior Moda Sensor testing procedures above. |
Older ECP Larson Electronics Panel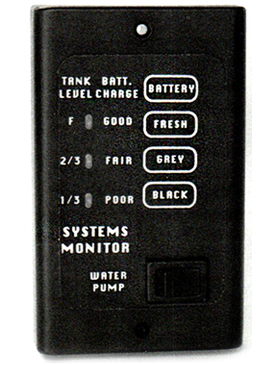 |
The ECP system was originally built by Larson Electronics as a replacement for the KIB systems that are so common in the current coaches even now. It can come in either Black or White. It used the standard drill in the wall tank probes that would have problems with buildup just as the KIB systems still do. This was discontinued many years ago as it was determined that these particular in tank probes just didn’t accomplish the task of reading the tank level with accuracy that was needed. We do not support this system any longer and only have the original link to the Manual below. If you need to find probes or a replacement panel and want to keep this system, you might be able to get what you need from KIB. They are available at most RV repair shops. |
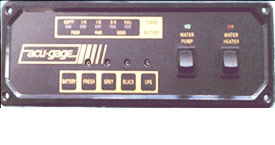
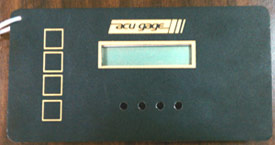
Older Acu-Gauge NC-1 Larson Electronics Panel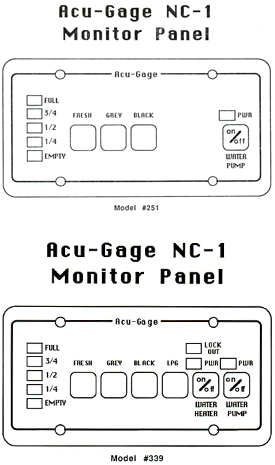 |
The NC-1 Acu-Gauge system was the original Larson system that used completely external sensors. It still measured at specific points of the tank unlike our current systems that measure the whole height of the tank. This system is no longer supported but is easier to update to our newer systems as it already has 2 wires going from each tank up to the panel. You can swap out the sensors on the tanks and swap out the panel for a current system as long as the wiring you have run is still in good shape. The only other information we have on these systems is in the below links. |
Bilge Buddy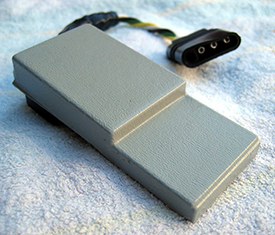 |
Snake River Electronics made a product at one time called the Bilge Buddy. This product is no longer made or supported as we didn't get information on that product. The only information we have is the manual linked below. |
For those of you who have Larson Electronics panels that are older than 1996 and are not shown here please read the below note.Back in 1996, the whole tank monitoring system was revamped. The way the signal was sent to the panel was changed to get rid of some bugs. Because of that, nothing before 1996 is compatible with anything after 1996. The company has also changed hands 4 times since then and none of the information regarding those old panels made it to us. That being said, if you have a panel that is older than 1996 but looks similar to one of the ones above, we have come across some anomalies that don't fit the pattern and we are able to help. The best way for us to know for sure is for you to send a picture of the front and back of the panel and the circuit board. We can then determine what we can do to help your situation out. Please send the pictures with your contact information to techsupport@tech-edge.com. If we cannot replace or fix your panel, we can discuss ways that we might be able to work with what you have to get a new system into place. We suggest watching the Features and Benefits of the iSeries panel video to see what you can upgrade to. (NOTE: click here to watch video directly on YouTube if video link isn't working) Thank you, Tech-Edge Manufacturing LLC |
|